Wednesday, December 3, 2014

Dream, Laugh, Live Layout

Hey everyone! Its me, Jo and its my turn up on the Couture Blog today.

I know its almost Christmas and I really should be focusing on Christmas cards and paper crafting but seriously I can't drag myself away from the beautiful Vintage Rose Collection papers!

Here is a layout to share today.


Here is how this layout came about.

First I cut a couple of slits in the top paper and distressed around the edges with my scissors.  I then added a little bit of texture paste and also some ink just for some extra interest.


I then built my page adding some more of the gorgeous paper.  I have added a couple of doileys using the Splendour die.  Half is tucked under my photo frame and also peaking out from the peek a boo section at the top.

I have made a frame using the nesting dies from the new Sweet Accents collection.  I cut it using 2 pieces of cereal boxes for a little bit of extra dimension and then embossed it.  Colour it by rubbing an inkpad over the top of it.


Here is a couple of close ups.  The gorgeous leafy swirl is a new release.  Very pretty!


A few pearls and some fussy cut butterflies again from the paper line and my layout is complete!


Thanks for stopping by and I hope in amongst in all the rush of the Christmas season you find some time to do what makes you happy - scrap!


Couture Creations products used:
Vintage Rose Collection
CO723956 Sweet Accents Nesting Dies
Leafy Swirl Die
CO723311 Splendour Die The Treasures Collection
CO723899 Christmas Border Die
CO721985 6mm Double Sided Tape
CO721997 Pearls Pink Blush
CO721955 Pointed Non Stick Scissors


Wednesday, November 26, 2014

Vintage Garden Papers Couture Creations

Hello paper people!  I have had the most fantastic time playing with these new Vintage Rose Garden papers.  They are just divine and teamed with some pretty dies just makes creating a breeze.

Here is my layout


I have stamped my background and then fussy cut from the papers as my main embellishing. By cutting some foliage from the Vintage Branch die (another new release) and placing under the fussy cut flowers my page didn't really need much else.  The tag at the top was cut from the new Sweet Accents nesting dies.  Sitting under the clock (which was cut using another new die Cuckoo Clock) I have used a die from the Christmas release.  This is the Christmas Border die.  I LOVE this die as its so versatile not just for Christmas!.  I kept my title simple by cutting from the papers again.

Here is a bit of a close up of some of the details.


Thanks for stopping by!


Couture Creations products used

CO724062 Vintage Rose Garden papers
CO723956 Sweet Accents Nesting Dies
CO723889 Christmas Border Christmas Lace Collection
CO702047 Vintage Branch Vintage Rose Die Collection
CO724050 Cuckoo Clock Vintage Rose Die Collection
CO721962 Foam Mounting Tape
CO721985 6mm Double Sided Tape
CO721997 Self Adhesive Pearls Pink Blush


Thursday, November 6, 2014

Mini Album - Vintage Rose Papers

Hello scrapping friends!  Its my turn again today on the Couture Creations blog. 

This month I have had the absolute pleasure of playing with the most gorgeous papers that have just been released - the Vintage Garden Rose papers.  OMGOSH!  I could ramble on forever about how beautiful these papers are.  Just divine!

Anyhow as soon as I seen them I knew I had to make a mini album with them.  This post is a little heavy on photos but I hope you enjoy.  I had a blast making this!


I have tried to keep the embellishing in this mini very simple because the papers are so pretty I didn't want to cover them up.

On the cover is the my favourite Beautiful Butterfly die with a quote from the paper line.


When the book is opened there is a pocket on the left hand side in the cover to house two tags.  On the other page it has a pull out tag for a nice size photo and it also pulls out to reveal another page that has a smaller flip out piece on it too.


I have used a simple flourish die and another of the quotes from the paper line.


To embellish this page I used the Mirror Mirror die and a blossom.  The leaves are from the Lucky Tree die.  The two words are also from the paper line


The opposite page has an on page pocket that reveals another little tag.  There are lots of little quotes that make embellishing this book or even cards and scrapbook pages easy!


This then flips out so lots more room for your photos.  The border along the bottom was cut from one of the Simplicity Borders die.


This next page is I didn't put any embellishing on except a quote.  I LOVE this paper and felt that it need to be shown off all on its own.  The page next to it has a pocket housing a photo mat and again I used the Simplicity Borders die.


The left hand page flips out for more photos.  The doily at the top is the Memories set trimmed with a blossom and the Lucky Tree die.


Another pull out tag on this page.  The fancy top was created using the Victorian Rectangle Nesting Dies.  I snuck in another little doily cut from the Cameo Set dies just peaking out from the quote.


And here is my last page.  I really liked the clock on this page so left it plain.
Through out my book I have had added some self adhesive pearls for a little glamour.  To stick my book together I have used 6mm double sided tape.  You can you glue but I find the this tape works really well.  I find glue sometimes too messy and guaranteed every time I do use it, I end up with it on my work or it seeps out the sides so for me the tape is best.  Its also a little forgiving if you don't press to hard the first time I always find I can reposition my work if I work gently with it first.


This paper really is such fun to work with!  Thanks for stopping by.

Until next time


Couture Creations Products used:

Vintage Rose Garden Paper Collection
Beautiful Butterfly Die CO723722 The Van Roe Collection
Lucky Tree Die CO723727 The Van Roe Collection
Cameo Set CO723246 Momento Collection
Memories Set CO723314 The Treasures Collection
Simplicity Borders CO723315 The Treasures Collection
Victorian Rectangle Nesting Dies CO723049
Self Adhesive Pearls Cafe Creme CO721999
6mm Double Sided Tape CO721985


Tuesday, October 21, 2014

Pion Layout

Hi and thanks for stopping by

My poor little blog really has been neglected of late.  I have been busy creating but just been a little slow on sharing.  So sorry.

Today I have a layout using the beautiful Pion papers.  Love these papers and its not typically a colour that I would scrap with.


Yep that's me when I was 17 years old playing my duties as bridesmaid for a cousin.

Those gorgeous flowers are the die and stamp set from Heartfelt creations. I didn't need much else for embellishing by using these. Love them!  I have used lots of doilies and punched borders to give my layout a really layered effect.

A pretty butterfly (Cherry Lyn from memory) and some pearls and ta daaaa my page is done!

Until next time

Monday, October 20, 2014

Graphic 45 Not So Mini Album!

Hey scrapping friends!

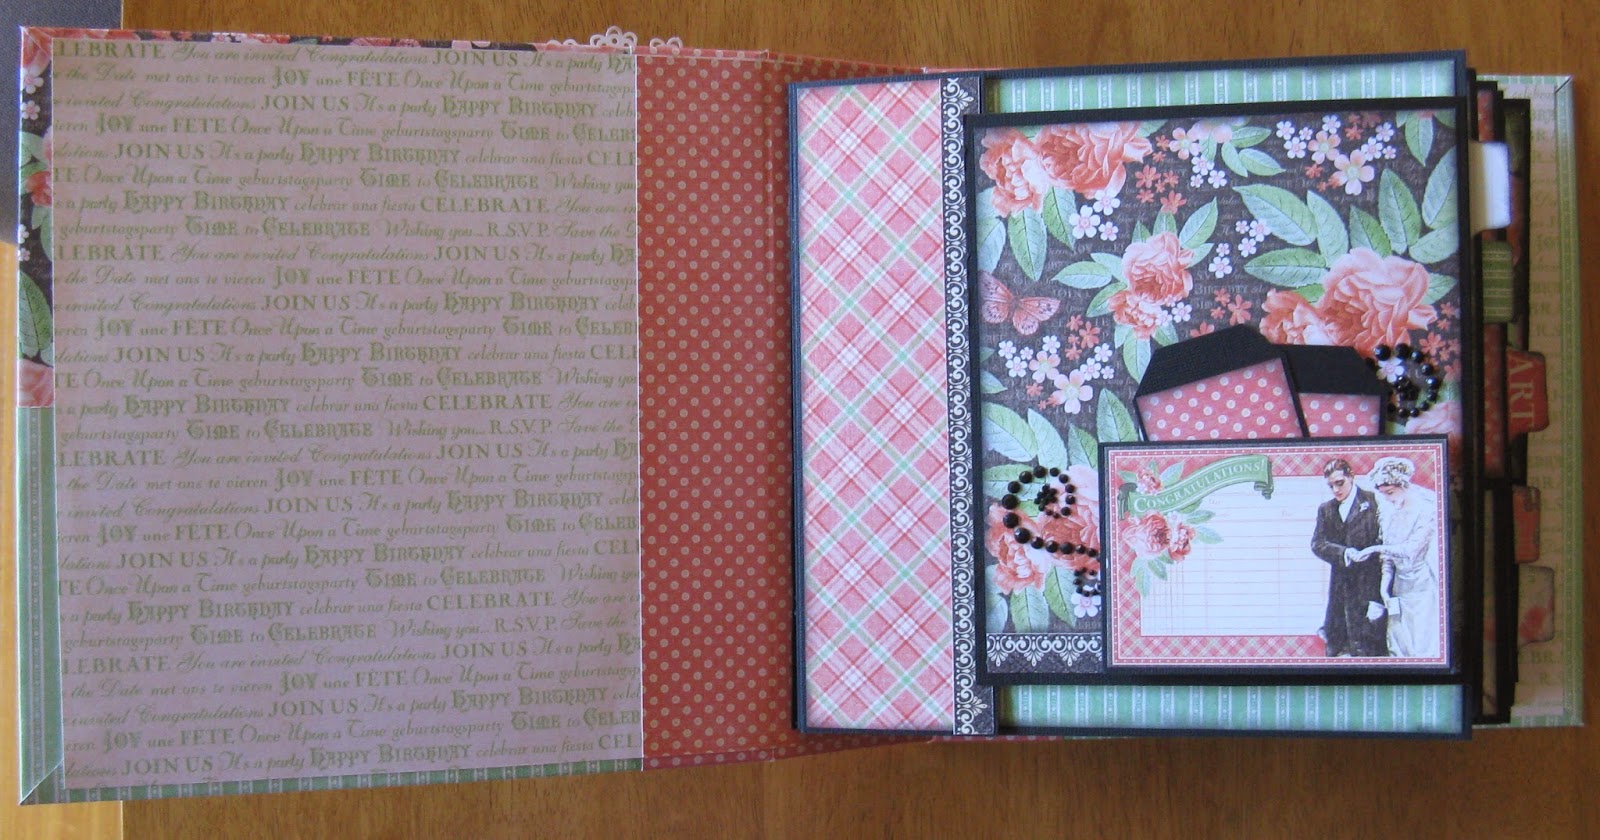
If you follow my work you will know that I love mini albums!  I have made a tone of them.  Today I have another mini album to share.  Well its a bit bigger than a mini and measures about 8 x 8 and using the gorgeous new Graphic 45 papers - A Time To Celebrate.

I can't take all the credit for this album as I got the tutorial from the wonderful Kona Raven!  Hi Kona!!!  This is the first time I have ever followed a tutorial or directions.  I am not one for measurements and usually love to do my own thing but when I came across Kona's album I just knew I had to give it a go.  Oh my gosh, this gal is just the best at these gorgeous albums and her tutorials are so easy to follow!

This post is a little photo heavy but I hope you enjoy.  It has lots of pockets and interactive pages.


The first page opens up and has a small pocket at the bottom and a flap that opens to the right


I reveals a pocket and a photo mat


This second page is really cool.  Where the little tabs are is Velcro dots.  This all folds down,


I have used a magnet as a closure on this page to keep it together

This is how it looks all open up


This page also has Velcro dots underneath and when open shows to tags in pockets.


This page has a little slider tab that holds it together and when unfolded has a pocket and more places for photos.


I am so happy with how this turned out but I think I am more happy with the fact that this tutorial was so easy to follow.  That is a plus for me as I am a very visual learner.

I have kept the embellishing quite simple without going over the top as I am going to use this album for my Wedding photos and little keepsakes from the planning our wedding.

Here is the You Tube link if you want to see how this album all works.  https://www.youtube.com/watch?v=fXJpXyrY74c.  Seriously you should check out her channel!

Until next time

Stay scrappy!

Saturday, October 11, 2014

Furry Friend Layout

Hey scrapping friends!  Today I have a layout to share with you showcasing a couple of the new dies and embossing folders and also some lovely chippie from our friends at Imaginarium


Here's how my page came about.

I first stamped over some white 12 x 12 cardstock with an embossing folder.  Just be sure you don't use an inkpad that is going to stain.  I used a Momento black inkpad and washed my folder straight away.  I also find the chalk inkpads work really well for inking your folder with too.

I then cut squares of patterned paper from the Damask Delight paper pad and also some co-ordinations cardstock.  I then ran the cardstock through my embossing machine using the new Zane embossing folder. 

To give my layout a more of a layered look I penned around all the edges of my papers with a black sharpie.  I then layered my papers.


Here's another look at some of the other details on the page.


The heart I cut from the Heart Nesting dies and again using the Zane embossing folder ran it through my machine.  I then just ran an ink pad over the embossed area.  The swirls from the heart are cut from the Swirl die and I just cut little bits off.  I have then used the awesome Simplicity Borders die and cut a strip from black cardstock to run down the right hand side of my page..

The little chipboard arrow and the stunning decorative frame are from Imaginarium Designs.

Thank for stopping by.  Until next time


Couture Creations Products Used


Monday, September 22, 2014

Journey Layout

Hey scrapping friends!
I have been super busy lately getting my school photos up to date.  My eldest boy is in year 11 and has just been offered an apprenticeship at the end of the year so he will be leaving and I still have so many school photos to scrap.
Anyway here is my layout.


Here's how I created this simple layout.
I first stamped my background with a few different stamps and different colour inks to give it a layered look.


I then cut my papers from the 12 x 12 Sew Jo Paper Pad.  These pads have lots of sewing themes on them but I love using the ruler and the other sheets for the boys school pages as they are getting older.
Here is how I created the cog border.  I cut 2 from the Cog Border die out of cereal boxes. 


I then inked them with VersaMark ink and embossed with a gold embossing powder.  You can see from the photo that they turned out a little shiny.


To tone it down a little, just very gently swipe over it with black inked sponge dauber.


I then heat set it too and let the embossing powder really bubble up.

To finish off my page I tucked a doily underneath my photos.  This is the new Splendour die.  Yep I know its a boy page but I can't help myself when it comes to these lovely doily dies!

I kept my title simple by using Journey die and adhering it to a tag that I cut using the Cameo decorative die.  The tag was cut from Core-inations card and sanded back.  I popped this all on mounting foam and tucked a flourish from the swirl die just underneath.

I love how these papers just worked for school photos now that the children are getting older.

Thanks for stopping by and allowing me to share


Couture Creations products used